
How to Create Collections in Shopify
If you're running an online store, then you know that Shopify is a great platform to use. It's user-friendly, conversion-focused, and has tons of features that can help you run a successful online business.
One of the great things about Shopify is that it allows you to create collections to organize your products.
So, why is this helpful? Making sure your products are well-organized with collections helps your customers find what they're looking for (or what they didn't even know they needed), which in turn can help improve your conversion rate.
Collections help you build the entire structure and navigation of your store, so they're important to get a hang of. Beyond just helping with navigation and sorting, collection pages help boost your website SEO as they offer an opportunity for custom copy on your site. Sweet!
In this blog post, we'll give you the lowdown on what collections are and how to create a collections page in Shopify.
We'll also chat about how collections can improve the user experience on your website and some lesser-known tips on how to use collections in crafty ways. So stay tuned!
Shopify collections + why are they useful
Collections are a way to group products together on your Shopify store and sales channels.
You can create a product collection based on a variety of criteria such as price, type of product, or theme.
For example, you could create a collection of all the products that are under $50, or a collection of all the products that are considered "gifts".
Creating your collections based on product details such as this will help a variety of visitors with different intents on your site. These types of collections are particularly helpful when creating in-depth navigation such as mega menus.

Creating collections also allows you to add additional text + information about the products you're grouping together by writing a collection description.
This helps give a higher-level overview of what makes your products stand out and why they are awesome!
For example, you can write a description of the collection and add a collection image. This is helpful because it allows you to give your visitors more information about what they'll find in that particular collection.

Beyond just helping your visitors navigate, you'll want to add a collection description as they are beneficial for your site's SEO because they give you another opportunity to use keywords and unique copy.
Collections are also frequently used/required in certain apps such as bundle builders, custom product option creators, and upsell/cross-sell apps—so, it's good to think about these when mapping out your overall collection page strategy.
To sum it up, collections are a great way to organize your products and improve the user experience on your Shopify store. But how can we get our first collection page up and running in Shopify?
Keep reading for a step-by-step guide on how to create a collection and more about collection types!
How to add a collection in Shopify
Create Collection
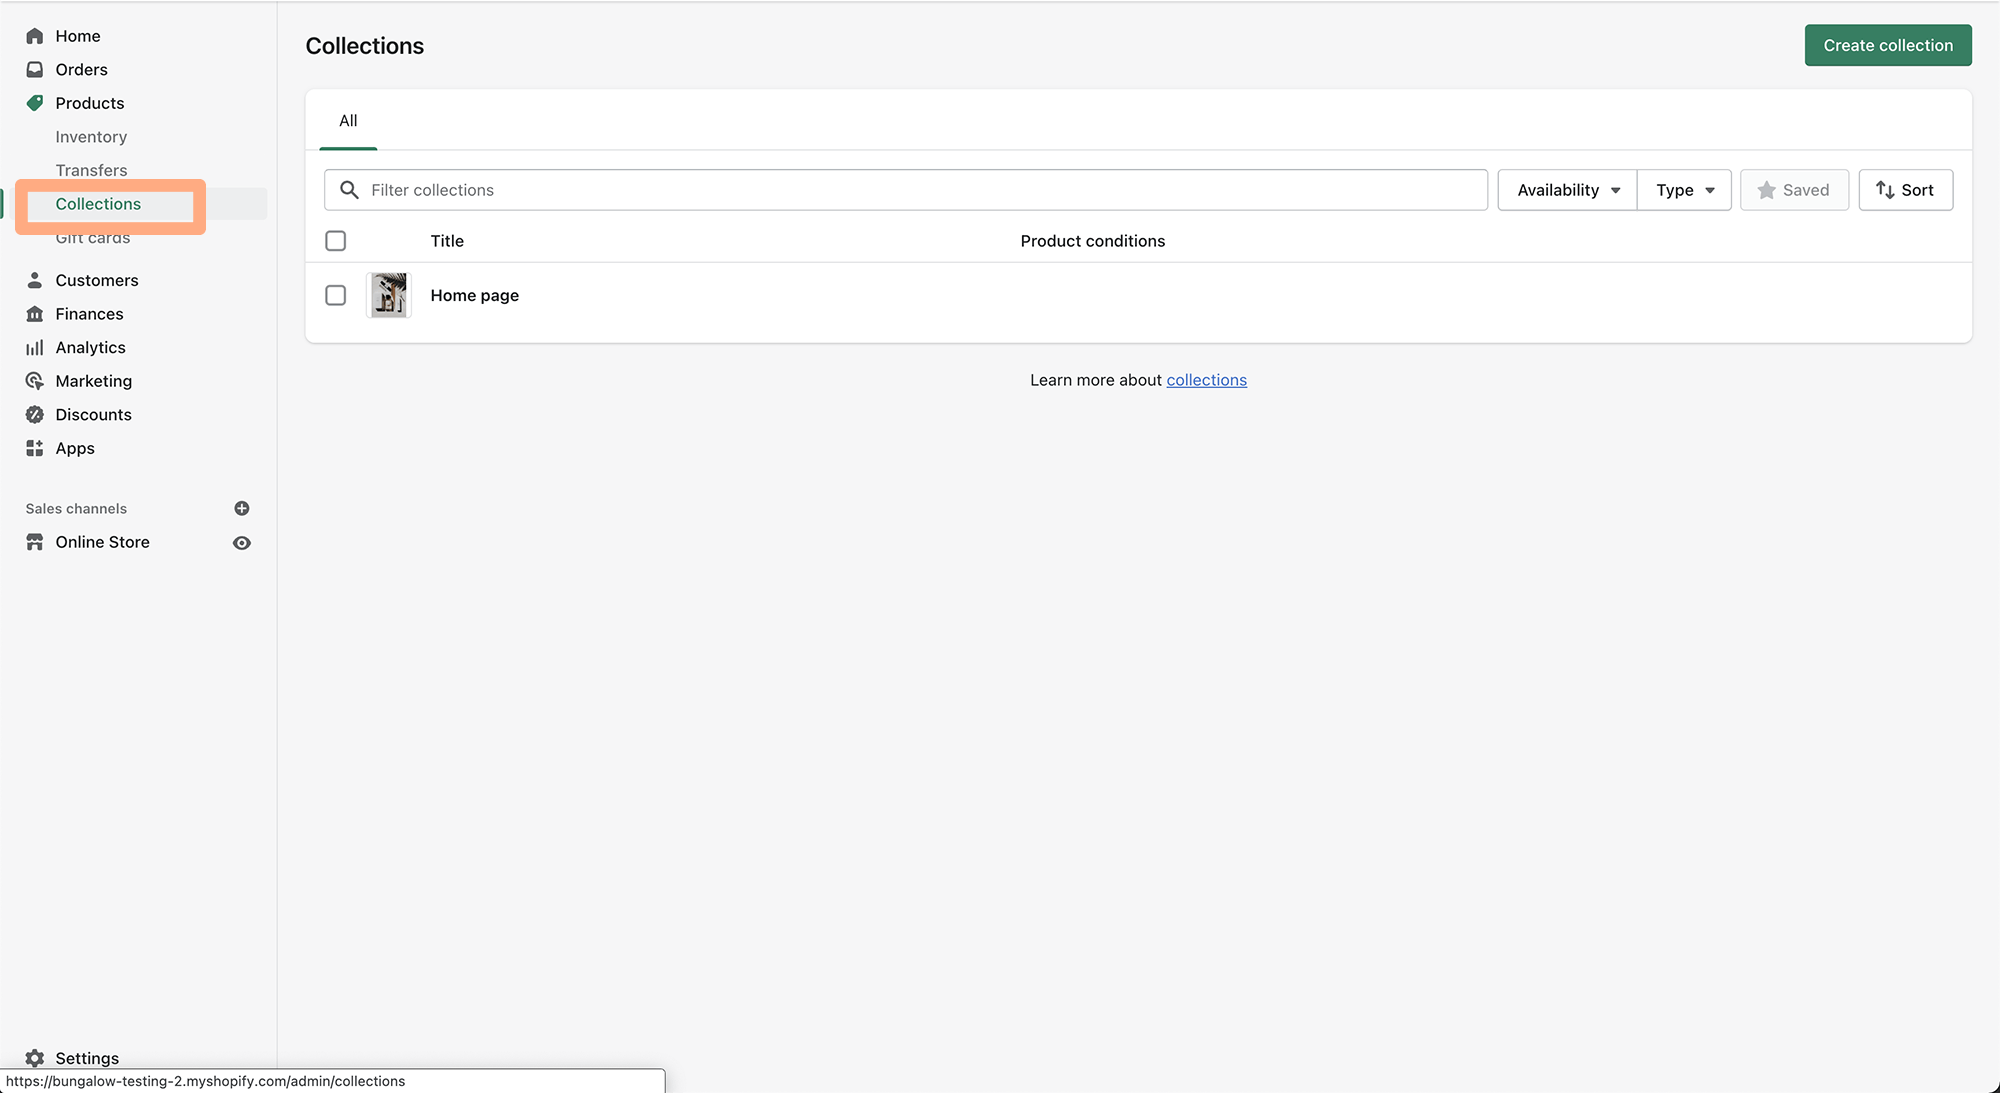
First, from your dashboard, you're going to want to go to "Products" and then "Collections." This is where you'll be able to create or edit collections.
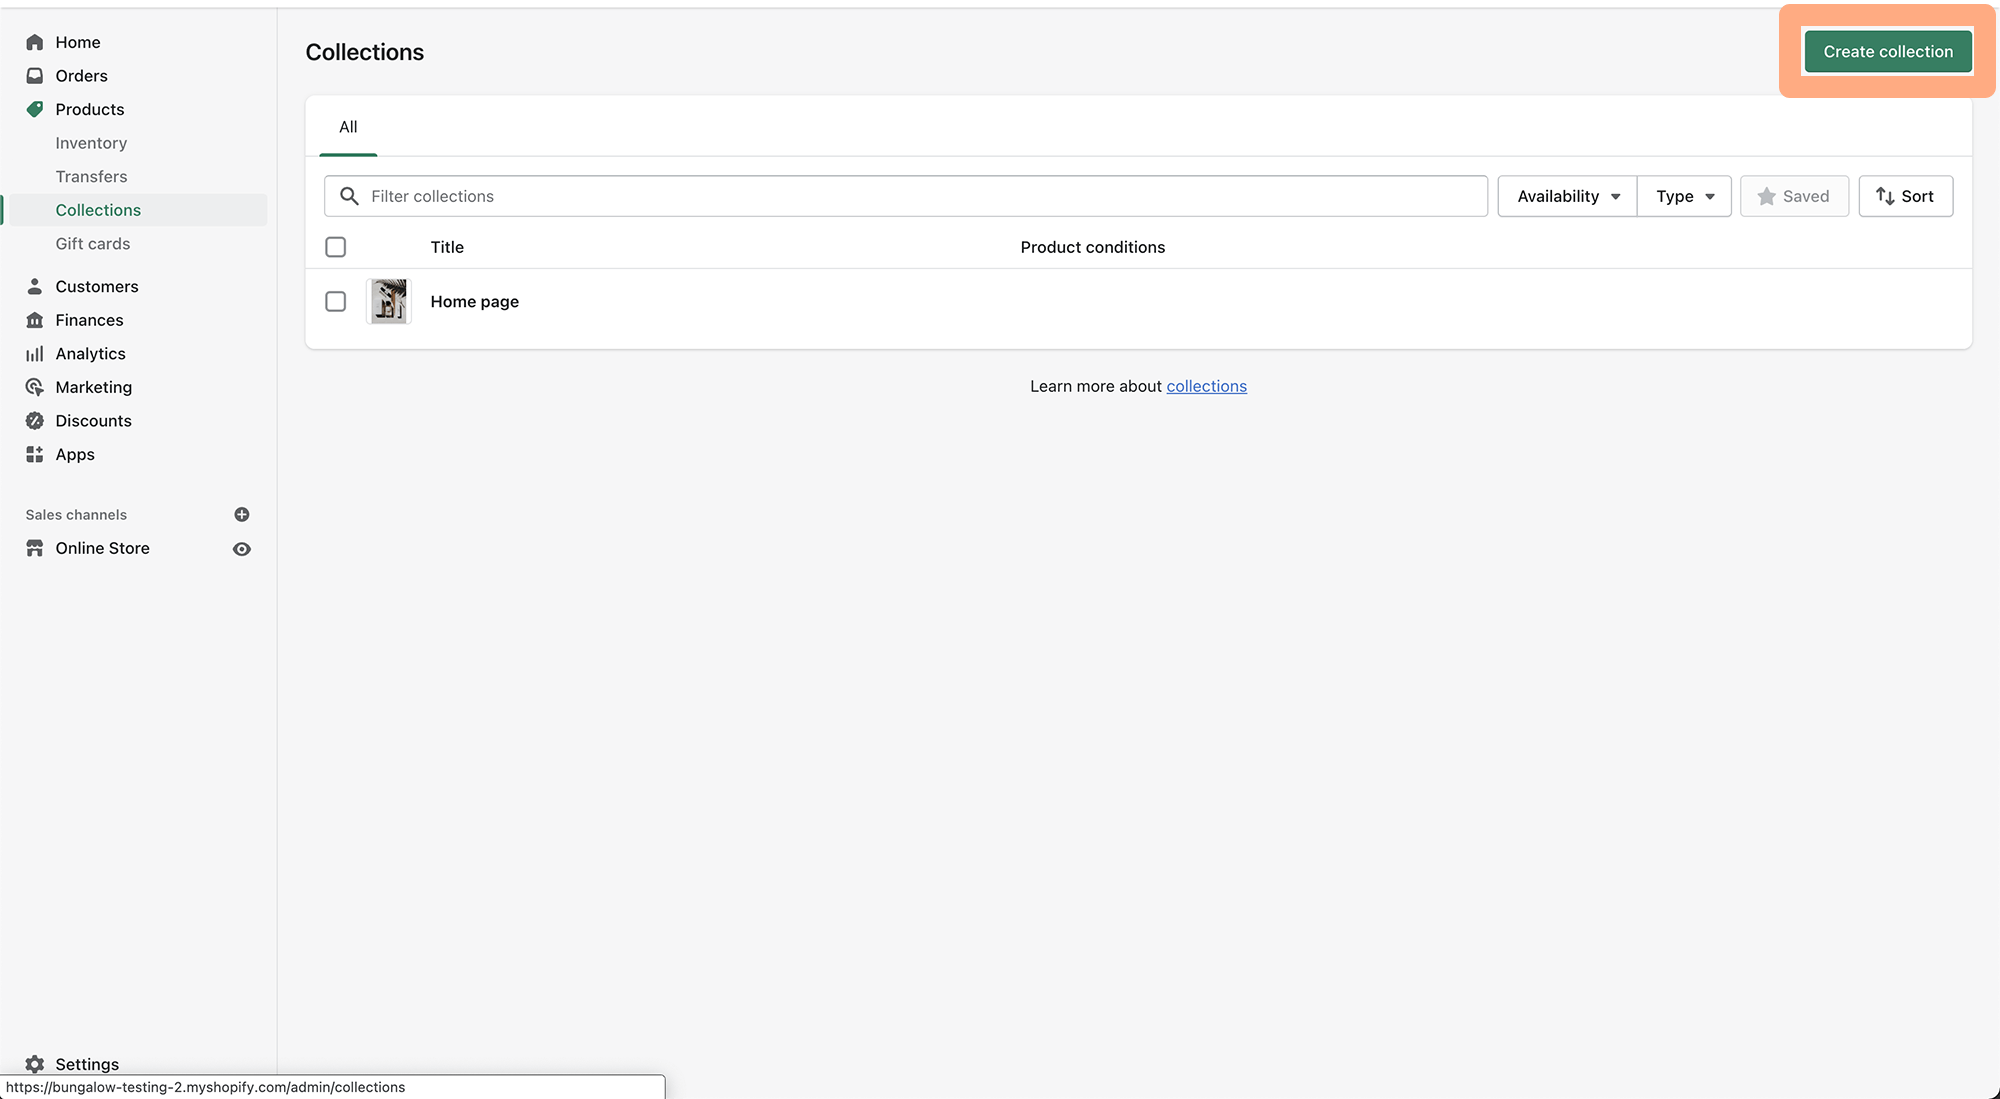
From there, you'll be able to create a new collection via the "Create Collection" button.
Naming your collection
When creating the title and description for your new collection, you'll want to be very clear about the type of products that will be in the collection—for example, "Gifts for Him" or "Summer Essentials".
When thinking up the titles for your various collections, you'll want to make sure that these titles and descriptions are also optimized for search engines.
So, avoid using more "artistic" titles and opt for ones that your potential visitors might be searching for—for example, "Beach Vacation Essentials" instead of "The Bondi Bundle".
This strategy also applies to your product pages—even if you'd like to name your products something more "out there", still include in clear words what the product actually is!
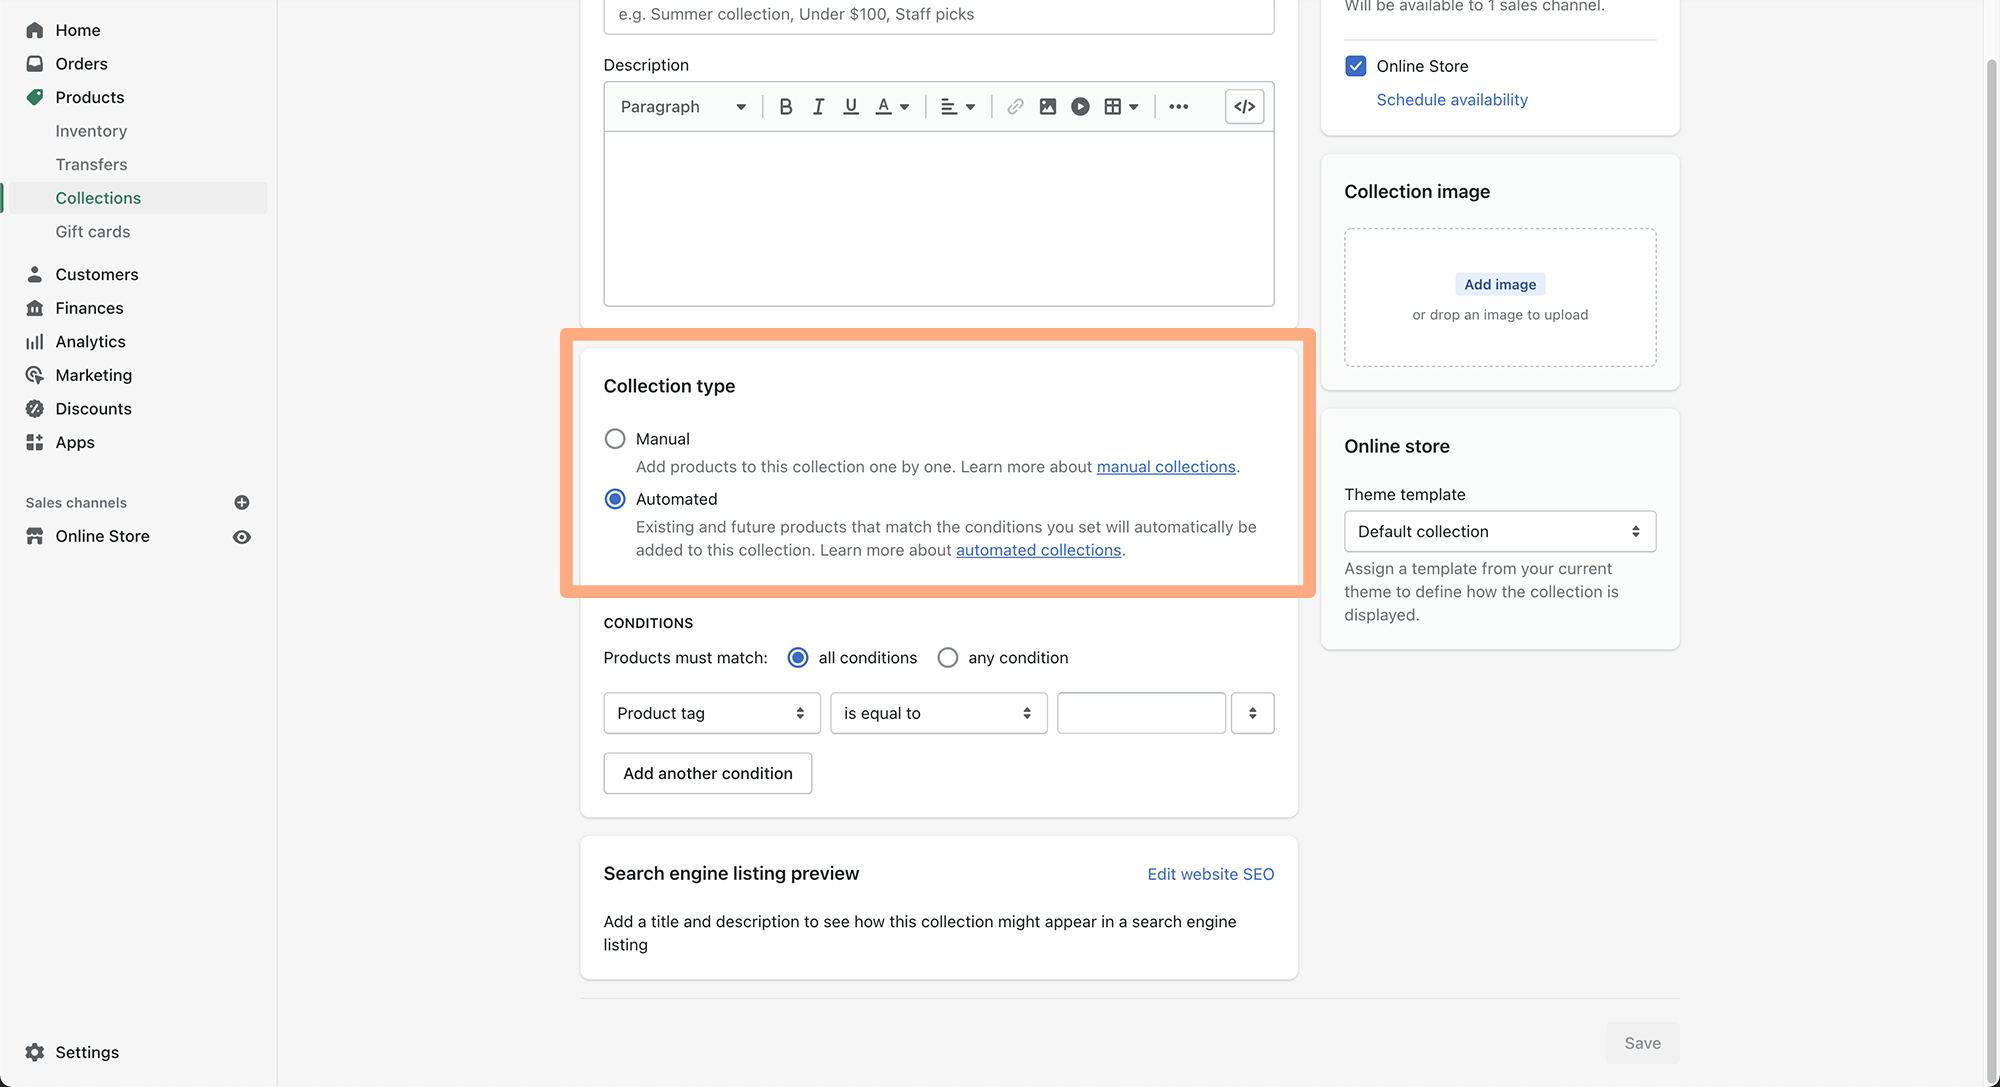
Manual Collections vs. Automated Collections
There are two types of collections in Shopify: a manual collection and an automated collection.
Both have their uses—note that once you create a collection you can't change back and forth between the two, so you want a good understanding of what type of collection to use before you spend time setting them up.
So, what collection type should you use?
When to Create a Manual Collection
Manual collections are great for smaller product catalogs, when you want to hand-curate a specific collection, or when you're running a flash sale with specific products.
This collection type is perfect for creating small or specialized collections or when you have seasonal or rotating inventories of some type.
You'll want to create a manual collection when you know that you won't get overwhelmed inputting and maintaining too many products.
For that reason, I recommend limiting yourself to about 20-30 items in a manual product collection. Anything above that will leave you pulling your hair out trying to manage everything manually!
When to Create an Automated Collection
Automated collections are generated based on conditions that you set and can be a huge time saver if you have a large product catalog.
This is because the collection's conditions automatically populate the collection page with the particular products that fit the conditions you've outlined. No need to manually add products one by one!
Note that automated collections have a limit of 60 conditions that you can set (although, I don't really see why you'd need that many).
One thing to consider when creating an automated collection in Shopify is that you need to be careful that products don't accidentally get added automatically before you're ready to launch/make them live on your storefront.
What do I mean by this? So, if you're doing a big product drop, double-check that the product(s) you're launching are not going to accidentally end up on a live collection page on your store. (Or, at least make sure that the product being launched remains in draft until it's ready).
Finalizing your Collection + Featuring it on your home page
Once you've hit create collection, input a title, description, collection image, and set up its manual or automated status, you're ready to click save!
Let's say you've just created a "best selling" collection and you want it to appear on an important page on your online store. This will be a little different for every theme, but the idea is the same.
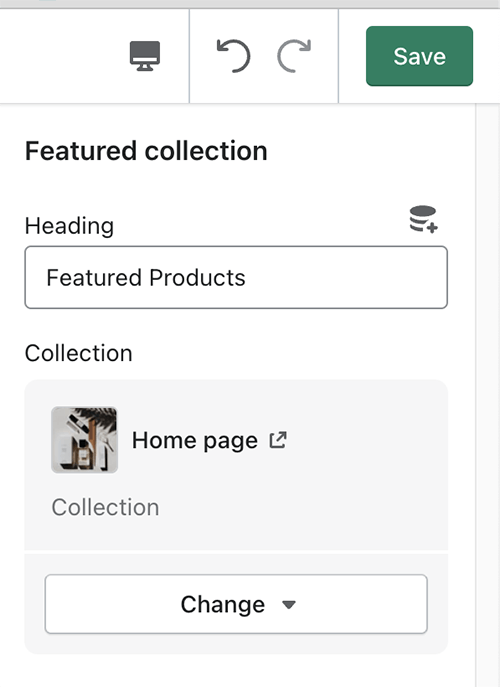
You're going to want to go to Online Store > Customize. From there, you'll add a section to your existing or new page such as "Featured Collection".
Next, you'll easily select the collection that you want to be featured, edit the title if necessary, and then tap Save. Now, the products in this collection will be displayed nicely and be clickable through to each specific product's page.
Additionally, if you have multiple collections/categories that you want your users to be able to shop from via your home page, you can feature a collection list.
An example of this would be featuring categories like "Lotions", "Hand Balms", "Body Washes", and "Haircare" on your homepage.
To do this, in the same area of the Customize section you'll want to pick a section typically titled "Collection List" and then select the specific collections that you want to be featured.
Cool! Now that you've got the hang of creating collections, how can we use them to our advantage in a smart way on our store? Peep the tips below!
5 tips for using collections strategically on your online store
1. Collections vs. Product Type vs. Vendor vs. Tags
Collections aren't the only way to organize your products in Shopify—there are a few other organization categories that you'll want to be aware of. Namely, Product Type, Tags, and Product Vendor.
These three organization buckets can be used to automate the creation of a collection, but not the other way around.
So think of these three categories as more specific, stackable pieces of information about your products that funnel them into the right collections.
Because of this, the same products can end up in a variety of different collection pages on your Shopify store.
Product type, vendor, and tags are all added within the product editor, not the collection editor.
These 3 buckets also serve the purpose of helping your visitors filter and sort products as they're browsing your store—so, it's a good idea to be intentional and thoughtful when first setting up your different product types, vendors, and tags.

When adding things such as product carousels and grids to your online store, you'll select a collection to feature, not product type or tag.
Therefore, if you wanted to feature body washes on your store and this was already a product type, you'd need to create an automatic "Body Washes" collection that's populated based on type.
This will allow you to easily feature your product types across your site.
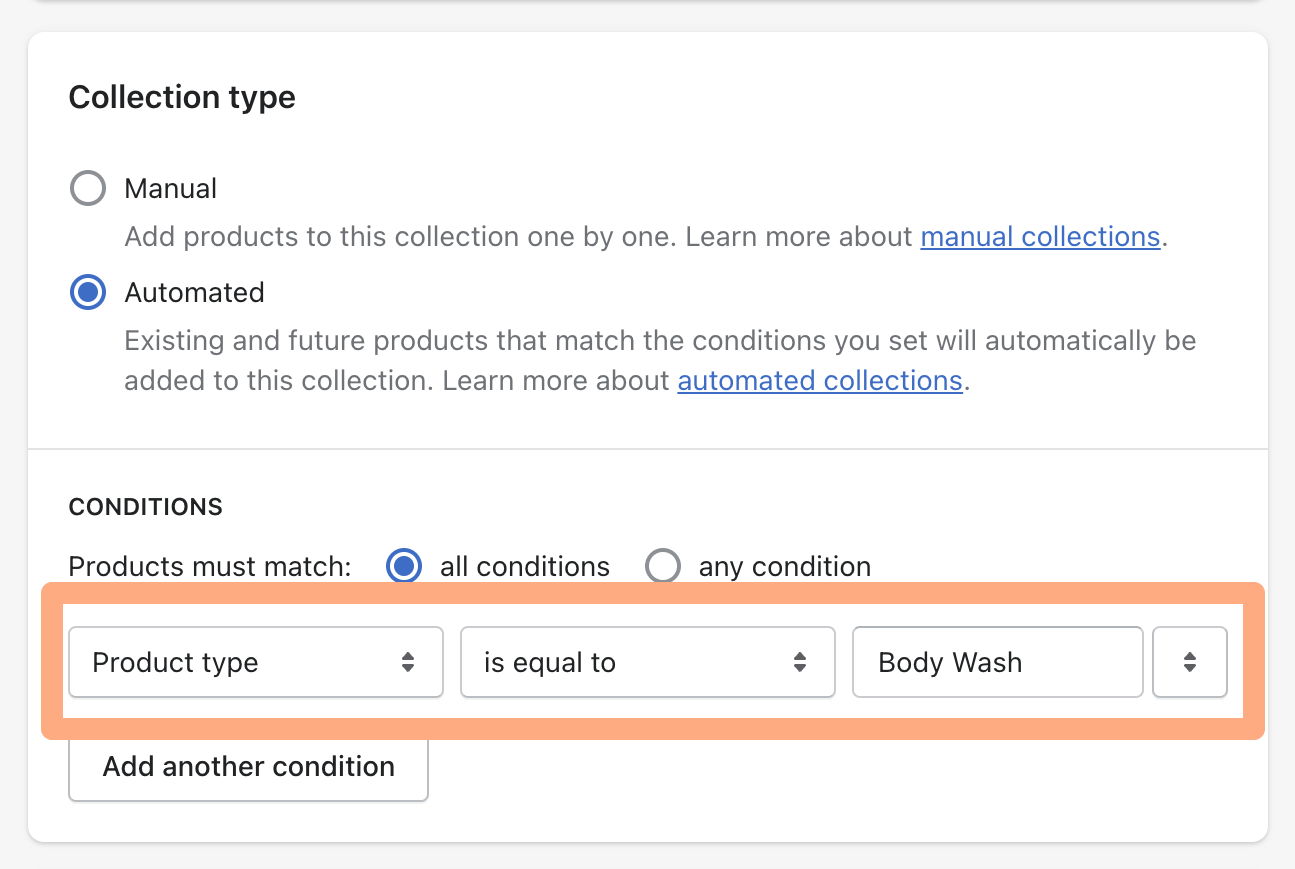
In short:
- Product types are used to group similar products together (for example, "Shirts" or "Dresses").
- Product Tags are used to specify attributes of the product (color, gender, material, age etc.)
- Vendors are pretty straightforward—these are great for a boutique or marketplace-style Shopify Site to feature the brands that they source their products from.
- Collections are the main categories that you'll be able to feature easily on your store via carousels, product grids, and individual collection pages. These can be directly created via one product type or tag (ex. "Shirts" or "For Boys" collections), or they can be created via a stack of types, tags, and other conditions (ex. Shop 2-3 Years Boys Sale).
2. Collection Menu Titles
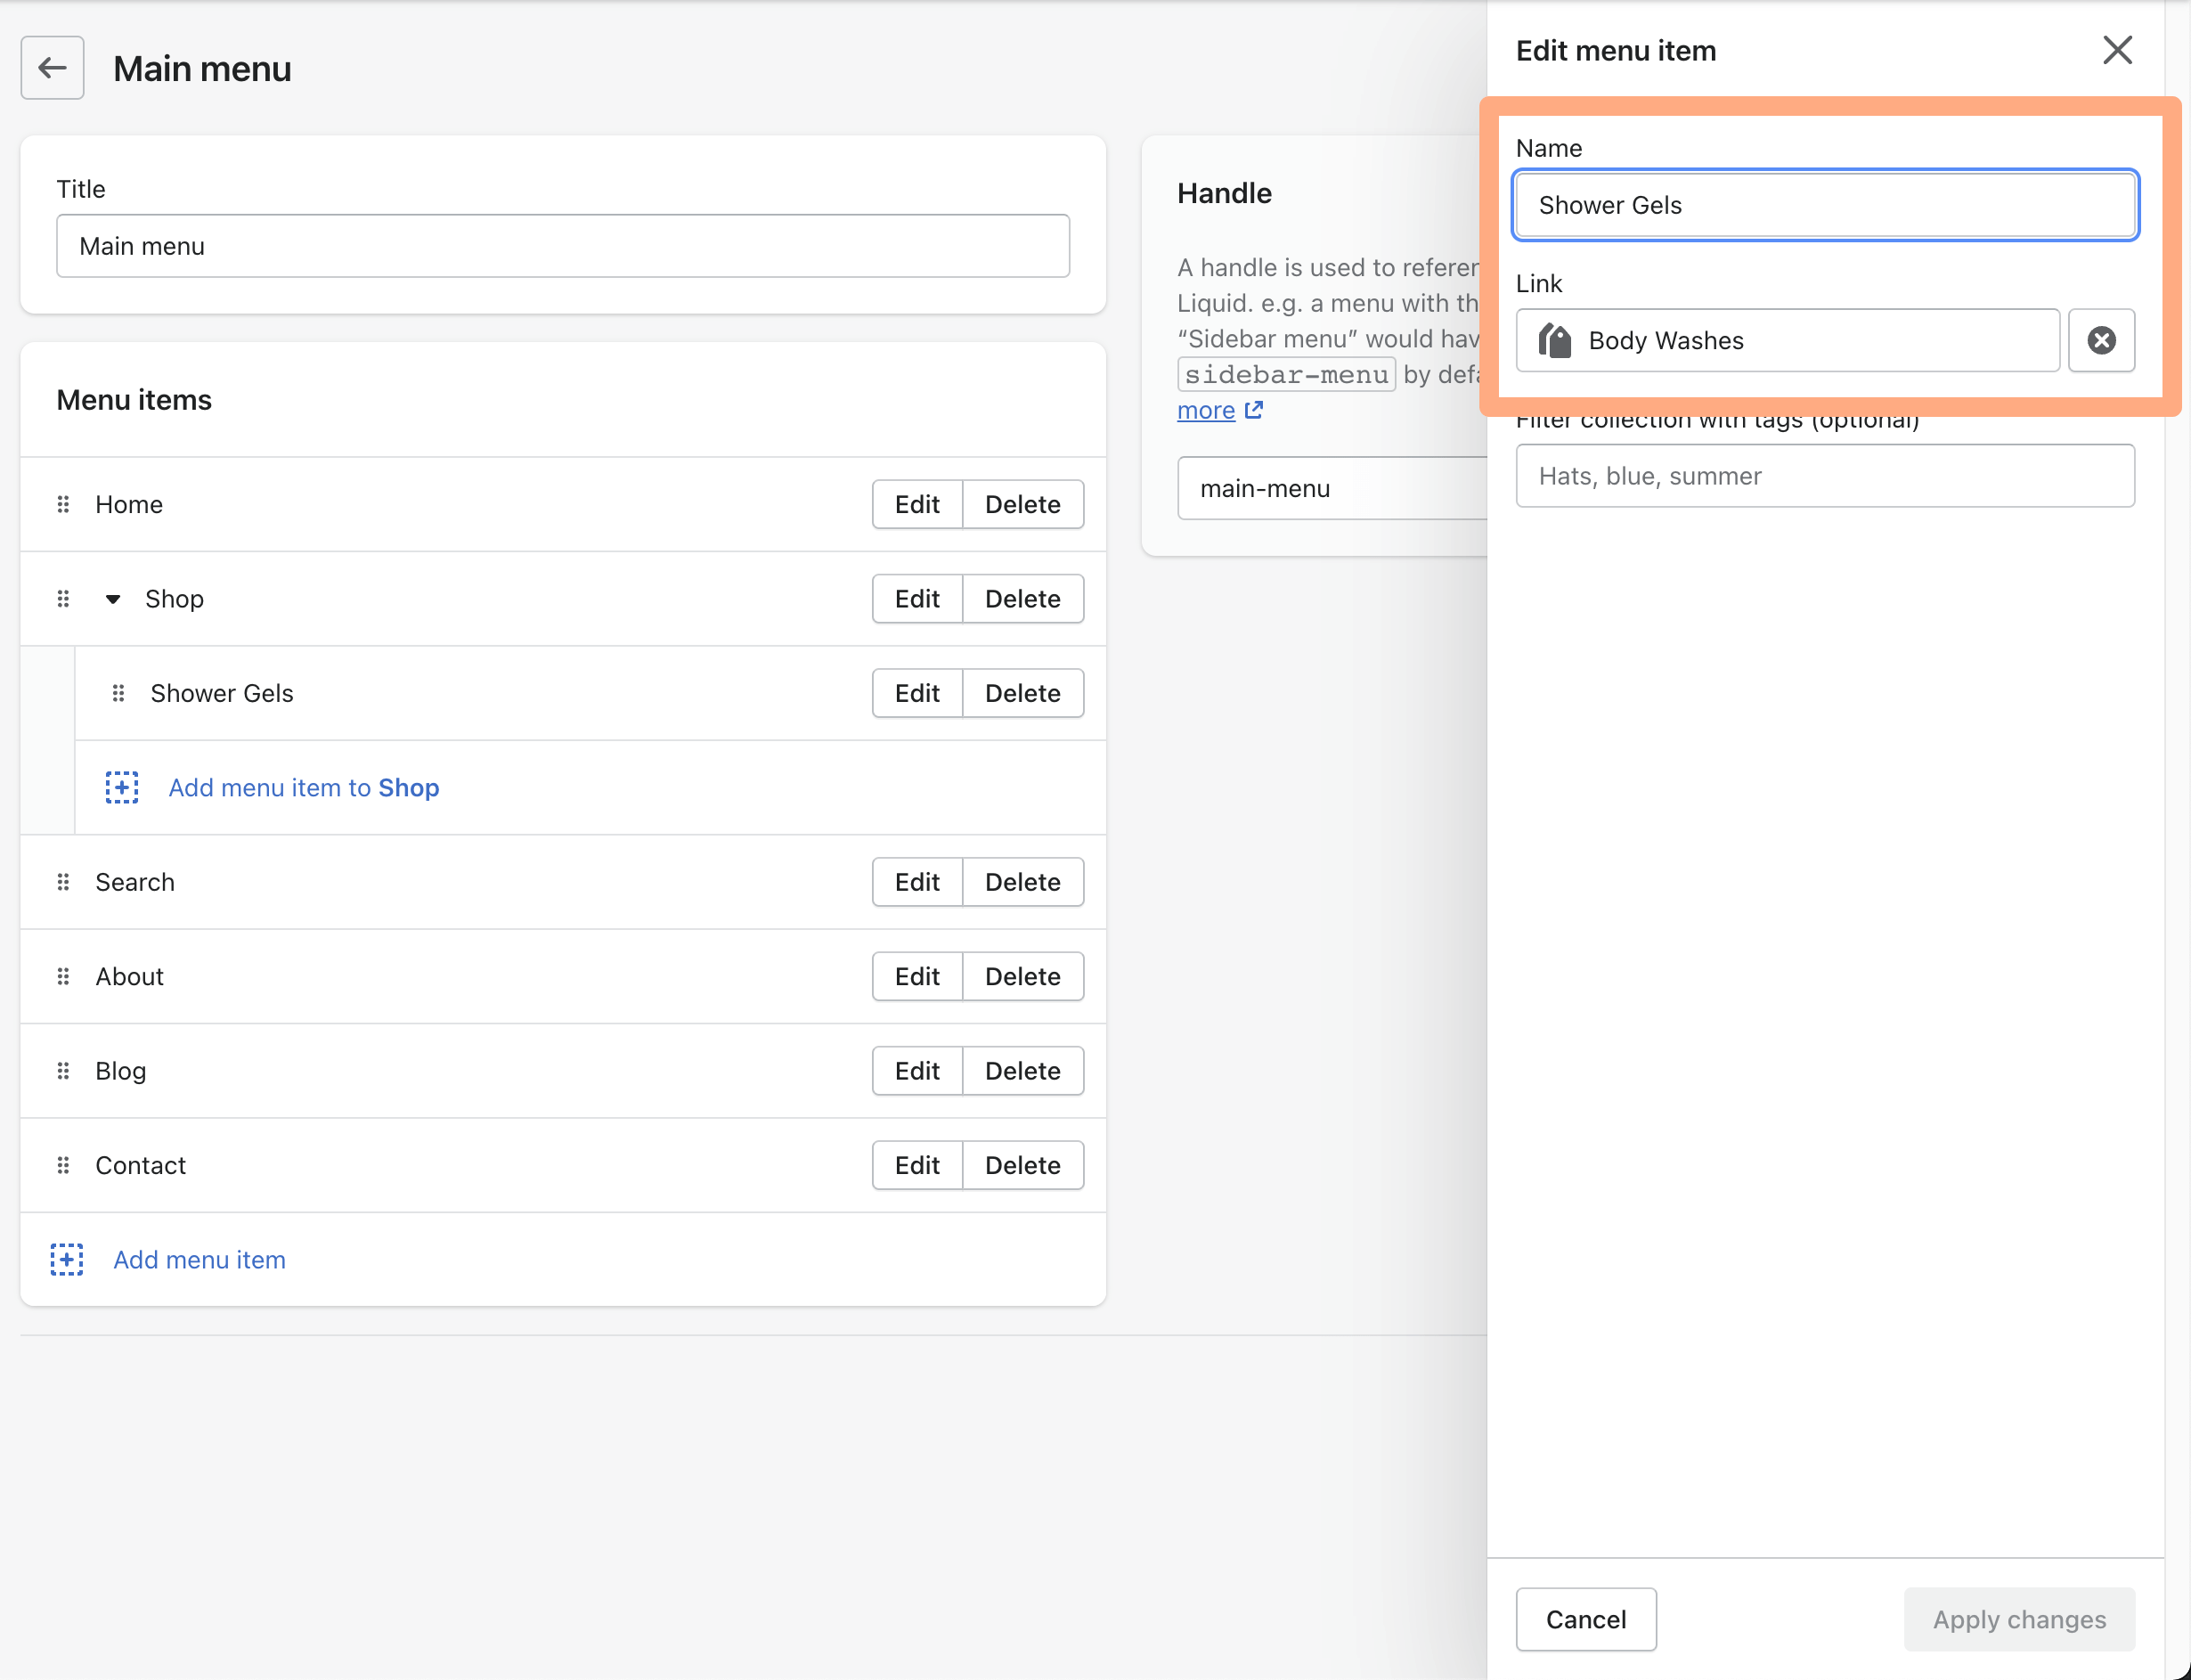
Something you may not realize about Shopify collections is that the menu names for the collections in your store's navigation (ex. your nav bar, mega/drop down menu, and footer) don't need to be the exact same as the name of the collection itself.
You can easily choose a different name for the link to your collection in the Navigation section of your Shopify dashboard. See below for an example!
3. Mega Menus
Collections are going to play a key role in creating a mega menu for your store.
Mega menus are typically used in stores such as fashion brands that have a large catalog and want to give their customers the ability to easily find what they're looking for without having to click through a bunch of different pages.
4. Using Collections for Wholesale
If you're running a wholesale business on Shopify, collections can be a great way to keep things organized and streamlined for both you and your wholesale customers.
You can use Shopify's built-in Wholesale Channel (or another third-party app) to set up wholesale pricing for specific products and then put those products into collections. Then, you can hide and send a link to this collection to your wholesale partners for easy browsing.
5. Using Product Types to Hide Products from your Shopify Storefront
A nifty way to remove products that are live from a collection page is to create a product type that's titled something like "removed". You'll then be able to use this product type in one of your automated collection's conditions to hide that product.
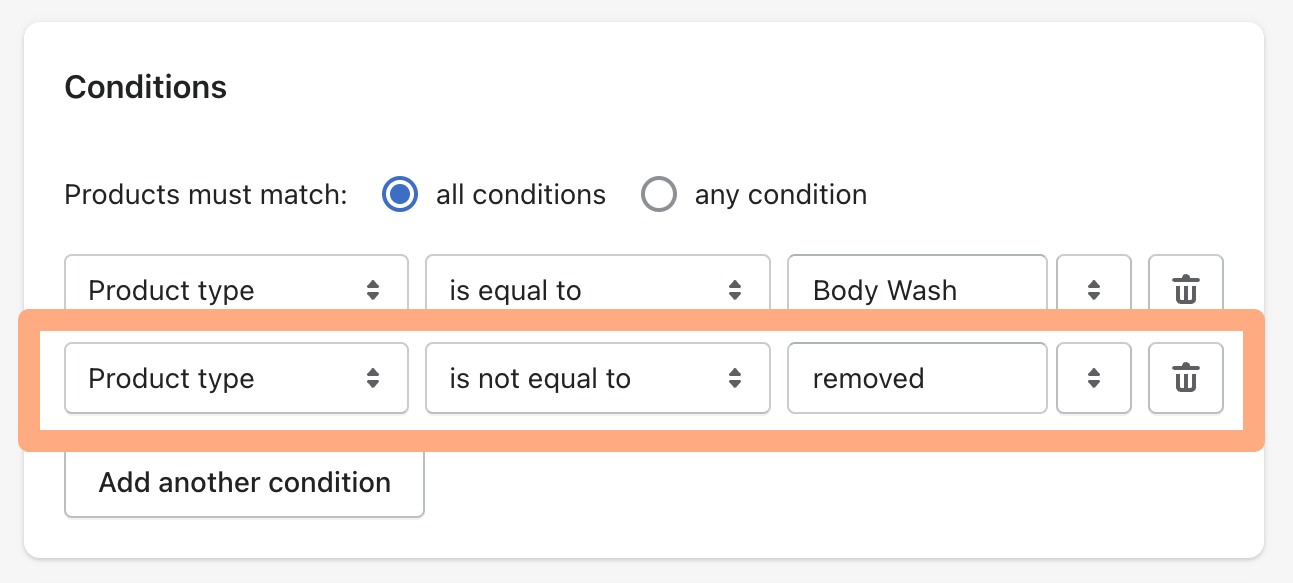
In the automated collection that you're looking to hide the product from, simply set a condition of product type is not equal to "removed", and voila! It will not appear in this collection.
-------------
Collections play a big role in Shopify stores, whether you're using them for wholesale, mega menus, or just to organize your products. Using them strategically can help your audience better navigate your store, which eventually leads to more orders and therefore revenue.
In this blog post, we've gone over how collections work and some of the different ways you can use them to improve your user experience.
We hope that this information is helpful as you build and design your own online store! If you have any questions or need help setting up your collections, please don't hesitate to get in touch. Happy Shopify building!